")


JavaScript Control Flow అనేది ప్రోగ్రామ్ execution ఎలా ఉండాలో నిర్ణయిస్తుంది
✅ if-else Statements
if-else statements decision-making కోసం ఉపయోగిస్తారు.
Syntax:
if (condition) {
    // Executes if condition is true
} else {
    // Executes if condition is false
}
Example:
let age = 18;

if (age >= 18) {
    console.log("You are eligible to vote.");
} else {
    console.log("You are not eligible to vote.");
}
Output:
You are eligible to vote.💡 Nested if-else Example
let marks = 85;<br><br>if (marks >= 90) {<br> console.log("Grade: A+");<br>} else if (marks >= 75) {<br> console.log("Grade: A");<br>} else {<br> console.log("Grade: B");<br>}Output:
Grade: ASwitch Statement (మల్టిపుల్ కండిషన్స్ కోసం)
switch statement ఒక value ని ఇతర case values తో పోల్చుతుంది.
Syntax:
switch(expression) {
    case value1:
        // Code execution for value1
        break;
    case value2:
        // Code execution for value2
        break;
    default:
        // Default execution
}
Example:
let day = "Monday";

switch (day) {
    case "Monday":
        console.log("Start of the week!");
        break;
    case "Friday":
        console.log("Weekend is near!");
        break;
    default:
        console.log("A regular day!");
}
Output:
Start of the week!Loops (Repeating Tasks in JavaScript)
Loops repeatedly execute a block of code based on a condition.
🌟 for Loop
for loop fixed iterations కోసం ఉపయోగిస్తారు.
Syntax:
for (initialization; condition; increment/decrement) {
    // Code execution
}
Example:
for (let i = 1; i <= 5; i++) {
    console.log("Iteration: " + i);
}
Output:
Iteration: 1
Iteration: 2
Iteration: 3
Iteration: 4
Iteration: 5
🌟 while Loop
while loop, condition true అయినంత వరకు run అవుతుంది.
let count = 1;
while (count <= 3) {
    console.log("Count: " + count);
    count++;
}
Output:
Count: 1
Count: 2
Count: 3
🌟 do-while Loop
do-while loop at least once run అవుతుంది.
let num = 1;
do {
    console.log("Number: " + num);
    num++;
} while (num <= 3);
Output:
Number: 1
Number: 2
Number: 3
🏆 Best Practices for Control Flow in JavaScript
✅ Always use {} for if-else blocks to improve readability.
✅ Use break statements in switch cases to avoid fall-through.
✅ Choose for, while, or do-while based on requirements.
🌟 Real-Time Project: Simple Login System
Objective: Create a simple login system using JavaScript control flow.
🔹 Step 1: HTML Code
<!DOCTYPE html>
<html lang="en">
<head>
    <meta charset="UTF-8">
    <meta name="viewport" content="width=device-width, initial-scale=1.0">
    <title>Login System</title>
</head>
<body>
    <h2>Login</h2>
    <input type="text" id="username" placeholder="Enter Username">
    <input type="password" id="password" placeholder="Enter Password">
    <button onclick="login()">Login</button>
    <p id="message"></p>
    <script src="script.js"></script>
</body>
</html>
🔹 Step 2: JavaScript Code (script.js)
function login() {
    let username = document.getElementById("username").value;
    let password = document.getElementById("password").value;
    let message = document.getElementById("message");

    if (username = = = "admin" && password = = = "1234") {
        message.innerHTML = "Login Successful!";
        message.style.color = "green";
    } else {
        message.innerHTML = "Invalid Credentials!";
        message.style.color = "red";
    }
}
🔹 Step 3: Run the Code
- Save the HTML and JavaScript files.
- Open the HTML file in a browser.
- Enter
adminas the username and1234as the password. - Click the Login button to see the output.
Expected Output:
✅ If the correct username & password is entered, it displays Login Successful!.
❌ If incorrect details are entered, it shows Invalid Credentials!.
Code Explanation (Line by Line)
- HTML Structure:
<input>fields collect username & password.<button>triggers thelogin()function on click.<p id="message">displays the login status.
- JavaScript Function:
document.getElementById("username").valuegets the username input.document.getElementById("password").valuegets the password input.if (username === "admin" && password === "1234")checks if the credentials match.- If correct, message is green with “Login Successful!”.
- If wrong, message is red with “Invalid Credentials!”.
ఇప్పుడు మనం JavaScript Control Flow (అంటే: if-else, switch, loops) ని ఉపయోగించి ఒక చిన్న రియల్ టైమ్ ప్రాజెక్ట్ తయారుచేద్దాం — Student Grade Evaluator.
Project Goal: Student Grade Evaluator
ఈ ప్రాజెక్ట్ ముఖ్య ఉద్దేశ్యం ఏంటి?
ఈ ప్రాజెక్ట్ ద్వారా:
- మనం ఒకే సారి అనేక మంది విద్యార్థుల మార్కులు ఎంటర్ చేసి,
- వారి మార్కుల ఆధారంగా గ్రేడ్ (A, B, C, D, F) ఇచ్చి,
- ఆ గ్రేడ్కి అనుగుణంగా ఒక మెసేజ్ చూపించాలి.
ఈ ప్రాజెక్ట్ ఎలా పని చేస్తుంది?
✅ Step 1: యూజర్ నుండి విద్యార్థుల సంఖ్య తీసుకోవడం
- మీరు ఎన్ని మందికి గ్రేడ్ ఇవ్వాలనుకుంటున్నారో, ఆ సంఖ్యను వెబ్పేజీలో ఎంటర్ చేస్తారు.
- ఉదాహరణకి: “3” అని ఎంటర్ చేస్తే, మూడు మంది విద్యార్థుల కోసం లూప్ తిరుగుతుంది.
✅ Step 2: ప్రతీ విద్యార్థికి మార్కులు అడగడం
- ఒక్కో విద్యార్థికి
prompt()విండో ద్వారా మార్కులు అడుగుతుంది. - ఉదాహరణకి: “Enter marks for Student 1”.
✅ Step 3: if-else ద్వారా గ్రేడ్ నిర్ణయించడం
- మార్కులు ఆధారంగా:
- 90 పైగా అయితే ⇒ A
- 75 పైగా ⇒ B
- 60 పైగా ⇒ C
- 40 పైగా ⇒ D
- అంతకన్నా తక్కువ అయితే ⇒ F
✅ Step 4: switch స్టేట్మెంట్ ద్వారా మెసేజ్ చూపించడం
switch-caseద్వారా:- “A” అయితే ⇒ Excellent performance!
- “B” అయితే ⇒ Good job!
- …
- “F” అయితే ⇒ Failed. Please try again.
✅ Step 5: ఫలితాన్ని స్క్రీన్పై చూపించడం
- ఒక్కో విద్యార్థి :
- మార్కులు, గ్రేడ్, మెసేజ్ అన్నీ స్క్రీన్పై చూపిస్తాం.
📁 Project Structure:
-> Open notepad and save files in HTML format and Js file format. Like Index.html and script.js
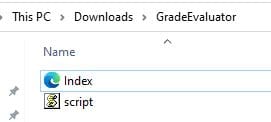
Index.html
<!DOCTYPE html>
<html lang="en">
<head>
<meta charset="UTF-8">
<title>Student Grade Evaluator</title>
</head>
<body>
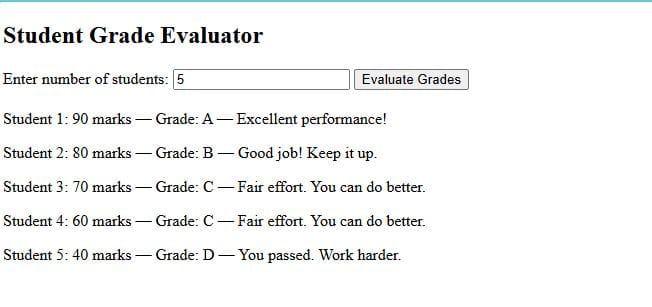
<h2>Student Grade Evaluator</h2>
<label>Enter number of students:</label>
<input type="number" id="studentCount" placeholder="e.g. 3">
<button onclick="evaluateGrades()">Evaluate Grades</button>
<div id="output" style="margin-top:20px;"></div>
<script src="script.js"></script>
</body>
</html>Script.js
function evaluateGrades() {
    const count = Number(document.getElementById("studentCount").value);
    const outputDiv = document.getElementById("output");
    outputDiv.innerHTML = "";

    if (count <= 0 || isNaN(count)) {
        outputDiv.innerHTML = "Please enter a valid number of students.";
        return;
    }

    for (let i = 1; i <= count; i++) {
        const marks = prompt(`Enter marks for Student ${i} (0-100):`);
        const score = Number(marks);
        let grade = "";

        if (isNaN(score) || score < 0 || score > 100) {
            outputDiv.innerHTML += `<p>Student ${i}: Invalid marks entered.</p>`;
            continue;
        }

        // if-else block to calculate grade
        if (score >= 90) {
            grade = "A";
        } else if (score >= 75) {
            grade = "B";
        } else if (score >= 60) {
            grade = "C";
        } else if (score >= 40) {
            grade = "D";
        } else {
            grade = "F";
        }

        // switch block to give message
        let message = "";
        switch (grade) {
            case "A":
                message = "Excellent performance!";
                break;
            case "B":
                message = "Good job! Keep it up.";
                break;
            case "C":
                message = "Fair effort. You can do better.";
                break;
            case "D":
                message = "You passed. Work harder.";
                break;
            case "F":
                message = "Failed. Please try again.";
                break;
            default:
                message = "Unknown grade.";
        }

        // Output result
        outputDiv.innerHTML += `<p>Student ${i}: ${score} marks — Grade: ${grade} — ${message}</p>`;
    }
}
| లైన్ | వివరణ |
|---|---|
<input type="number" id="studentCount" /> | ఇది ఒక టెక్స్ట్ బాక్స్ లాంటిది, కానీ నంబర్ మాత్రమే ఎంటర్ చేయడానికి. దీనిలో ఎన్ని విద్యార్థుల గ్రేడ్ ఇవ్వాలో ఎంటర్ చేస్తారు. |
<button onclick="evaluateGrades()">Submit</button> | ఈ బటన్పై క్లిక్ చేసినప్పుడు, JavaScript లో ఉన్న evaluateGrades() అనే ఫంక్షన్ రన్ అవుతుంది. |
<div id="result"></div> | ఇక్కడ ఫలితాలు (విద్యార్థుల గ్రేడ్లు, మెసేజెస్) చూపిస్తాం. |
<script src="grade.js"></script> | ఇది JavaScript ఫైల్ను హెడర్లో జత చేయడం. మన కోడ్ అందులో ఉంటుంది. |
Javascript code Explanation
🔍 JavaScript లో ఏం జరుగుతోంది? Step-by-Step:
✅ 1. function evaluateGrades()
ఈ ఫంక్షన్ బటన్పై క్లిక్ అయినప్పుడు రన్ అవుతుంది.
✅ 2. var count = document.getElementById("studentCount").value;
ఇది యూజర్ ఇచ్చిన విద్యార్థుల సంఖ్యను తీసుకుంటుంది (ఎంతమంది విద్యార్థులకు మార్కులు ఇవ్వాలో).
✅ 3. for loop ద్వారా మొత్తం విద్యార్థుల కోసం తిరుగుతాం:
for (var i = 1; i <= count; i++) {
  ...
}
ప్రతి విద్యార్థి కోసం మార్కులు అడుగుతుంది (prompt ద్వారా).
✅ 4. if-else ద్వారా గ్రేడ్ కల్కులేట్ చేస్తాం:
if (marks >= 90) grade = "A";
else if (marks >= 75) grade = "B";
...
మార్కుల ఆధారంగా గ్రేడ్ (A, B, C…) నిర్ణయిస్తాం.
✅ 5. switch స్టేట్మెంట్ ద్వారా గ్రేడ్కు అనుగుణంగా మెసేజ్ చూపిస్తాం:
switch (grade) {
  case "A":
    message = "Excellent performance!";
    break;
  ...
}
✅ 6. ఫలితాన్ని వెబ్ పేజీలో చూపించాం:
resultDiv.innerHTML += "<p>Student " + i + ": Marks = " + marks + ...ఈ లైన్ ద్వారా<div>లో ఫలితాన్ని డైనమిక్గా జత చేస్తాం.
Final Output ఎలా వస్తుంది?
మీరు బ్రౌజర్లో ఫైల్ ఓపెన్ చేస్తే:
- మీరు ఎన్ని మంది స్టూడెంట్స్ అన్నది అడుగుతుంది.
- ప్రతి ఒక్కరి మార్కులు అడుగుతుంది.
- ఫలితంగా:
"Student 1: Marks = 85, Grade = B, Message = Good job!"లాంటివి స్క్రీన్ పై చూపిస్తాయి.